Welcome to my world….

Thought it might be time for a little studio tour for those who haven’t seen it!  This is where Mother and I spend a large chunk of our time, both working and playing.

If I were a techie instead of a glassie, I’d have a really cool 3-D video tour to show you, but I’m afraid you’ll have to settle for still photos instead.  😀  Our studio is in one enclosed stall of my 3-car garage.  Its not fancy, but it sure suits our needs.

Our bench

We’ll start where most of the magic happens….our bench!  When I decided to build the studio, we drew out the size and shape of our bench, including a return on each side for extra tools, mandrel buckets, etc., and had a friend build it to our specifications.  We have another friend in the heat and air business, and he cut, bent and installed the metal top for us.  Our ventilation system was also built to specs for us by Glasscraft, and it does a great job venting the studio.  Mother and I both work on GTT Crickets and oxygen concentrators from Unlimited Oxygen, and we share a kiln in the center of the bench for all of our soft glass.

Storage and boro kiln

To the right of my end of the bench, we’ve got this great storage cabinet. The drawers hold all kinds of stuff from frits, shards and murrini to all of our books and tutorials in that ginormous bottom drawer.  The other cabinet stores our extra torches, hoses, regulators and manifold that we use when we host classes for our ISGB chapter.  The chilipepper kiln on top is my boro kiln.

"Friends" bench

Mother and I LOVE it when we have playmates come to visit, so directly behind our bench, we keep two spare torches hooked up at all times. (Also GTT Crickets)  This is also the area where we keep our bead presses, extra handtools, and most of our soft glass frits.  You can also see the little chop saw we use to cut tubing for coring beads.

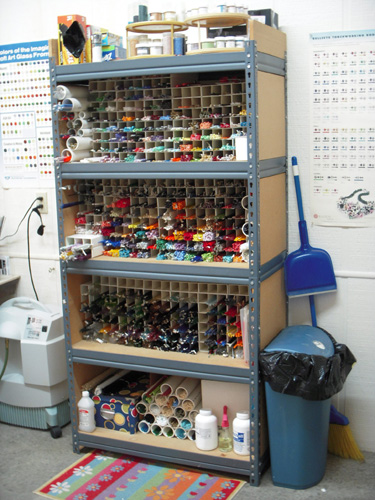
104 COE glass rack

This is our 104 COE glass rack.  CIM, Reichenbach, Kugler and Vetrofond oddlots on the top shelf, silver glass and Effetre opaques on the second, and Effetre transparents on the third.  The bottom shelf is just overflow of common colors that we order in bulk.  The turntables on top of the shelving unit contains enamels, and yes….you know its coming….more frits.  😀

More storage

To the right of the 104 rack is another storage unit where we keep our maintenance tools and other sundries.  A small spare kiln and a couple of extra concentrators are on hand in case of breakdowns, and the dart board is a fun way to blow off some steam when the glass just isn’t flowing the way we think it should.  😀

More glass!

The second glass rack contains all of our other COEs.  Bullseye is on top, all 96 COE brands in the middle, and boro color below that.  On top of the rack, our business license is displayed, along with extra bubble wrap and packing supplies.

The breakroom

I loved the workbench I have in my metal room so much, I got us another one for the glass studio!  It gives us a nice place to sit and have a cup of coffee in the wintertime (in the summer we’re out on the deck that’s attached to the exterior door to the left of this shot).  It also serves as a great place to unpack and label our glass orders when they come in, and the drawers add some extra storage for odds and ends.  I also keep my rolling mill in this area on a nice little table that’s bolted to the wall for stability.  On the shelves below, all of my metal etching materials are stored, along with texture plates for the rolling mill.  Above that area is what we jokingly call our “Wall of Flame”.  Everyone who comes to our studio to teach or play has to sign the wall.  😀  This wall is my very favorite part of the studio.  Every single signature up there brings up its own set of VERY happy memories, and Mother and I feel so blessed to have so many creative and talented people in our lives and we’re proud to call each and every one of them friends.

I’d love to see pictures of your studio space.  Care to share??

Bursting with Pride

Have you ever had one of those moments when you were so proud of someone that you literally thought your heart would burst?  Your child’s first steps, their graduation day, a family wedding.  I had one of those moments yesterday afternoon when I opened my mailbox and found this waiting for me…..

Haunted on Bourbon Street, by Deanna Chase

Deanna signed up for the NaNoWriMo project a couple of years ago, and unlike most of the people I know who give it a try, she discovered there was a serious writer inside her just waiting to bust loose!  A few of us were lucky enough to get to follow along with Jade’s adventures as Deanna was crafting her chapters, and we literally couldn’t get enough!  Reading it this way reminded me of the excitement of getting the next installment of the seriel novels I used to read as a kid.  And when the story was complete, I was already begging Deanna to get started on the next book.  LOL!

Needless to say, I was completely over the moon when she decided to go forward with publishing, and I’ve literally been counting the weeks until I had the hard copy in my grubby little hands.  There is something so satisfying about watching someone you love bring their dream to fruition, and I’m not sure I’ll ever be able to see that spine with Deanna’s name on it peeking out from my bookcase without tearing up with pride.  I’ll be adding to the Chase literary collection through the years (I hope!), but I can’t imagine that owning another book will ever affect me as emotionally as this one has.

Here’s a little teaser about Haunted on Bourbon Street, and if you’d like to pick up your own copy, just go here.

Jade loves her new apartment  ̶ until a ghost joins her in the shower.

When empath Jade Calhoun moves into an apartment above a strip bar on Bourbon Street, she expects life to get interesting. What she doesn’t count on is making friends with an exotic dancer, attracting a powerful spirit, and having feelings for Kane, her sexy landlord.

Being an empath has never been easy on Jade’s relationships. It’s no wonder she keeps her gift a secret. But when the ghost moves from spooking Jade, to terrorizing Pyper, the dancer, it’s up to Jade to use her unique ability to save her. Except she’ll need Kane’s help—and he’s betrayed her with a secret of his own—to do it. Can she find a way to trust him and herself before Pyper is lost?

ISGB Gathering 2011…. Best time ever!!

Welcome to the Gathering!

And did Louisville ever make us feel welcome!!  The conference was held at the Hyatt Regency and the Kentucky International Convention Center next door.  And talk about convenience… when we stepped out the front door of the Hyatt and turned left, we were one block away from the hot spot known as Fourth Street Live.  A diverse area of restaurants, night clubs, and shopping.

Fourth Street Live

Day one of my trip began with the Steering Committee meeting for all the regional directors.  Afterward we all went to a great restaurant called Myan Cafe for a little rest and relaxation.  And of course, a bead swap!

Sam and AnneMarie at Myan Cafe

The presentations were held in the convention center next door to the hotel, and they were all standing (or laying!) room only.  And with a line-up that included Dora Schubert, JC Herrell, Sara Sally LaGrand, Hayley Tsang, John Kobuki, Heather Trimlett, Robert Dancik, Sharon Peters and many others, its no wonder the auditorium was packed every day!

Packed crowd for JC Herrell's presentation

Melanie, Angie and Verna waiting for the first presentation of the day to begin

The community project theme this year was “Possibilities”, and several ISGB members sent in beads for the aquarium display that was donated to the local Ronald McDonald house.

"Possibilities" community service project for Ronald McDonald House

Open torch hours were extended this year, and there was a crowd there every single night.  There were several torch tables like this one set up, and glass was donated by several vendors for the attendees to use.  I have a feeling that a lot of new equipment and glass will be shipping out to new homes in the next few weeks.  😉

Participants trying out some new torches

Saturday rolled around and it was time for the Bead Bazaar!!  Our chapter, The Smoky Mountain Firecrackers, participated, and it was our first group show!  Sales exceeded our expectations, but the best part for all of us was the overwhelmingly positive response we received to our table set up, and our chapter’s participation in this years conference.

Melanie, adding some finishing touches to our display

Closeup shot of the Firecracker table

Just a few more candid shots of bead bazaar day…..

Dora Schubert and her beautiful beads

Harold Cooney and Trey Cornette getting their tables set up

My new pals Paula, Nancy, Lori and Brenna

JC Herrell's gorgeous, colorful table

Jennifer Geldard getting her "game face" on

After the Bazaar, we got our tables packed up and headed back to the Hyatt to get ready for banquet night!  We had a fabulous dinner, followed by the Hall of Flame presentation and the silent auction.  I’m please to say that I picked up a couple of super nice items during the auction, and everyone was very generous with their donations and their bids.  This is one of the ISGB’s main fundraiser’s every year, and, fingers crossed, it was a big success this time!

Verna, Kathy, Renee and Suzanne waiting for dinner to be served at the Firecracker table

Sunday, it was more fabulous presentations during the day, followed by my favorite part of every Gathering…..the bead swap!  I was honored to trade with nearly every single person who participated this year, and I came home with some beautiful bling from all the talented, generous participants!  😀

Let the trading begin!

After the bead swap, it was time for the closing party.  We seriously got our boogie on, but it was also bittersweet because we knew we’d soon be saying goodbye to all of our old (and new) friends for another year.  But for the most part, we decided to cut loose and leave the sad farewells for morning.  😉

Putting on our boogie shoes!

Melanie and Kevin acting the fool

So as you can see, when I subtitled this post “best time ever” I meant it.  And have the pictures to prove it!!  As for some of those “other” photos….. they’ll be blackmail for bead swaps next year in Bellvue, WA.  Bwahahahahaha!

Metal Tool Necessities….part 2

If you missed part one of this series, you can get caught up here.

Okay, let’s just jump in where we left off with number six on the necessary list….A good disc cutter.

Pepe Disc Cutters

Now if you remember, I said in my earlier post that there are several places on this tool list where you can cut corners and go the inexpensive route with tools from places like Harbor Freight, Northern Tool Supply, etc.  Your disc cutter is NOT one of those cost-cutting items.  In this instance, you definitely get what you pay for!  I use Pepe cutters which you can find at Otto Frei, FDJ Tools, Gesswein, etc., in a variety of sizes.  The Swanstrom cutter system from Rio Grande is also an excellent tool, and I have several friends who use that brand with as much success as a Pepe.  These tools are a bit pricey….depending on the size and brand, they can run anywhere from $75-200.  BUT….the time and labor you will save filing and sanding your discs will make them pay for themselves in the long run.

Number 7 on the list is a dapping/doming set.

Pepe Dapping Set

Santa brought me this AWESOME Pepe dapping set for Christmas last year, (because I was a VERY good girl), and it is perfectly machined.  Each dap, ranging from 1.3mm to 50.1mm has a corresponding hole in the doming block.  Just a couple of gentle taps will perfectly dome even work-hardened brass pieces.  But this is another one of those times when a less expensive tool will do.  I still have my $20 dapping set from Harbor Freight, and its actually the one I use when I travel to teach.  Partly because its smaller, lighter and easier to pack, and partly because its pretty much indestructable and easily replaceable if its damaged by an inexperienced user. I’d recommend the entry level set to anyone just starting out.

Number eight on my list is an item recommended to me by Misty Shwiyyat of MistyMade….Sanding sticks

Sanding Sticks from Rio Grande

These are available from Rio Grande for $4.50 each.  The sticks have velcro applied to one end, and they sell sandpaper strips in several different grits that just stick right on.  I keep a coarse grit on one, a medium grit on one and a super fine on the third one, and they literally do ALL of my hand sanding chores.  I can’t even tell you when the last time was that I had a metal file in my hand!  These are fast and much more agressive than I ever expected them to be, and I can’t thank Misty enough for sharing them with me!

Number nine on the list of necessaries are a variety of stamping an texturing tools.

Texturing and stamping tools

I’ve shown a couple of neat texture hammers that can be found just about anywere metal tools are sold.  These have a different texture on each end, and they run in the neighborhood of $20 each.  I also have a variety of pattern stamps….things like hearts, stars, smiley faces, scrolls, shamrocks….the possibilities are endless!  Most of these run around $8 each and you can build your arsenal according to your taste whether you want to make whimsical items or more classic graphic design patterns.  At some point, you’re probably also going to want a set (or six!) of alphabet stamps.  There are many, many different font choices out there, and you can get as fancy as you want.  If you’re looking for a cheap, entry level set just to see if you enjoy making personalized items, check out this one from Whole Lotta Whimsy for under $30.  The set I’ve shown is my current favorite (yes….I have more than one set 😀 ) called “Clementine” and it came from an Etsy seller, Next of Kenn who also happens to carry a lot of cool pattern stamps.  I could spend a small fortune in his shop!

Finally, we’re to number 10 on the list, but this item should probably have been at number one or two, since it ranks right up there with my disc cutter on my list of favorite tools, and that’s my tumbler.

Lortone 3A with jewelry grade stainless steel shot

Mine is a Lortone 3A.  I started out with a cheapo Harbor Freight tumbler, but the noise drove me absolutely insane and I quickly upgraded to a better, more reliable brand.  I’ve been using my Lortone for over two years, and haven’t even had to replace the belt yet!  I keep it loaded with about a pound and half of jewelry grade mixed stainless steel shot.  Just add a drop of dawn dish soap, whatever components or finished jewelry pieces you need to tumble and cover with water.  If I’m just cleaning pieces, I usually just run it about 30-45 minutes, and even the dirtiest, most tarnished items come out bright and shiny.  If I’m tumbling to work harden, I generally run it a couple of hours.  Even if you never intend to get into metalworking on a grand scale, I’d recommend one of these tumblers just to clean your existing jewelry!  I’ve tried sonic systems, chemical cleaners, polishing cloths….and nothing works as simply or as easily as my tumbler.  These run in the $60 range, plus the cost of your shot, and worth every penny!

That’s it for my list of necessities to get you started.  Later on we’ll take a look at some of the “man I wish I had one of those” items that this metal obsession will lead to!  😀

My bags are packed, and I’m ready to go…..

To Louisville, KY for the International Society of Glass Beadmakers annual conference, The Gathering!  Loads of demonstrations, presentations, open torch time, bead trading, vendors to shop with, and my favorite part…..the Bead Bazaar!

If you’re anywhere near the area on Saturday, July 30th, it would be well worth your time to come to the Kentucky International Convention Center, Exhibit hall 1-A.  There will be over 100 glass artists with their creations on display.  Admission is only $5, and its a great opportunity to see your favorite beadmakers’ work in person instead of on a computer screen.

Mother and I will be with our chapter, The Smoky Mountain Firecrackers, at table number 5, right inside the entrance to the bazaar.  Stop by and say hello!  We’d love to put faces with some of the names we’ve become so familiar with over the years.  😀  Here’s a little preview of our table during our practice setup at the last meeting….and it will look even MORE awesome on Saturday!

Smoky Mountain Firecrackers bead bazaar table

I’ll try to update and post some pictures while I’m there, but its a super busy week.  So if you don’t hear from me until we get back next week, I’ll be sure to fill you in with all the details.  Bead on!  😀

An Old-fashioned Book Report

Today I want to talk about a fantastic how-to book.  Its called “The Workbench Guide to Jewelry Techniques”, by Anastasia Young.

The Workbench Guide to Jewelry Techniques

Not only am I a tool junkie, but I’m a bit of a book whore, too.  And this is one that I’d had in my Amazon wish list for a loooong time, but the $35 price tag had me a little gunshy.  I love to be able to hold a book in my hand and browse through its pages to see if its really something that is going to further my education.  But the reviews for this one were so overwhelmingly positive, that I decided to take the plunge, and boy am I ever glad that I did!  This book is hands-down one of the best, most comprehensive jewelry books I’ve ever seen.  A treasure trove of advice for the novice, and a wealth of information for intermediates, too.

It starts with a guide to setting up your workbench, and Ms. Young has shown tools and materials that I didn’t even know existed, but now I realize I need!  She then goes on to discuss materials in great detail from precious metals to gemstones and more.  Then she gets down to the nitty gritty in the techniques section.  Everything is covered…drilling, filing, soldering, annealing, polishing, constructing, fold forming, stone setting, carving and casting….and I could go on and on.  But I’d rather you didn’t waste any more time reading what I’m writing.  Instead, RUN, don’t walk….and get your own copy of this amazing reference book.  Oh, and did I forget to mention??  Now that I’ve bought my copy.  It’s on SALE!  😀

Metal tool necessities….part 1

I came up with the bright idea that I wanted to add some top ten lists here.  Books, materials, sources, tools, etc.  But I’m already wondering if maybe I have TOO many favorites….at least when it comes to my metal working tools

Anyone who knows me will tell you that I’m kind of a tool junkie.  Will I need it?  Who cares!  Its all about WANT, right?  😉  But the purpose of this series is really to get down to the bare bones of what you need to get started.  With the glass tools, making a top ten list wasn’t that hard.  I have my favorites (some cheap, some not so cheap) that are my go-to tools for almost all the beads I make.  But when it came time to narrow down the metalworking list, I REALLY struggled.  So to compromise, I broke them into two lists….”necessities” and “you’re really gonna want one of these if you get into metal working much at all”  (or “extras” for short 😀 )

So, in part one of the necessities list, we’re going to start with the basics.  First things first.  If you’re going to do any sheet metal work at all, you’re going to need an assortment of hammers.

Multi-use hammers

This photo shows the hammers I constantly find in my hand.  First is a regular 1 pound Stanley hammer from the hardware store.  Uses are limitless….everything from punching out discs to dapping and doming.  The second, is a two-headed hammer with a nylon head on one end, and brass on the other.  I don’t use the brass end a lot, but I have to change that nylon head quite often.  Its used anytime you need to flatten or move your metal slightly without distorting any pattern you’ve applied.  The third is my new favorite, and the most expensive of any of the hammers I own.  Its a Fretz mini-hammer number 7 with 9 interchangeable plastic heads.  I’d tell you what this hammer is intended to do, but it would take up a lot less space to tell you what it won’t do, because it has a head for every job!  LOL!  The fourth is my rawhide mallet.  Again, it won’t mar or distort your metal, but its perfect for forming and workhardening your project.

Specialty hammers

The first hammer shown in this picture is a 3 pound deadblow, again from the hardware store.  Its overkill for most of my work, but when it comes time to punch out large discs….say anything over an inch….its what you want to do the job.  (Unless of course you’re luckier than me and have your own hydraulic press!)  The center hammer is a standard chasing hammer.  I don’t use mine much anymore since I upgraded to my Fretz hammers, but the one shown is a good entry level hammer that can be purchased for around $17.  The flat side will flatten and harden your wire or sheet, while the “peen” end is used for texturing.  The last hammer I show might not even warrant a spot on the necessities list, but it was one of those “just can’t live without it” tools.  Tiny, cute, lightweight….perfect if I’m just banging out a few little odds and ends on my dining room table instead of pounding on the workbench.  Told you I was a junkie, didn’t I??  😀

Number two on the necessites list is a light-duty torch.

Blazer butane torch and fire brick

The torch I’ve shown is a Blazer butane torch from Rio Grande.  There are cheaper torches….even a butane creme brulee torch will work for small projects.  And I should also interject here that I don’t solder a lot.  I can, but I just don’t really enjoy the stress of it, and I also prefer the look of cold connections when I can get away with them.  BUT…. if you are going to work with metal with any regularity, eventually you are going to get into a project where you have to anneal your work.  After pounding, twisting, and shaping, metal gets work hardened and brittle.  But firing up your trusty torch and annealling it to just the right temperature makes it soft and pliable again.  So even if you don’t ever want to learn soldering, don’t fool yourself and think you won’t need a torch.

Third on my necessities list is a good hand punch.

Hand Punch

And when I say good, I don’t necessarily mean expensive.  You can buy these from Eurotools for around $35, or you can go someplace like Harbor Freight or Northern Tool supply and pick up one like mine for less than half that price.  And the cheapies work just as well!  There are a lot of corners you can cut on tools, and some that you shouldn’t.  This is one of those instances where you want to go the inexpensive route.  My hand punch (and most that I’ve seen) have seven interchangeable bit sets that will punch holes from 1/8 inch up to 9/32.  If you ever want to make your own fancy washers or bead caps from textured or etched metal sheet, you’re definitely going to want one of these!

Number four on the list is a bench block.

Rubber based bench block

Now I have a regular 4×4 inch steel bench block, but I’m showing you this one instead because I’m absolutely in love with it.  (Obviously….you can see the wear and tear)  That rubber base significantly lowers the decibels of noise when you are pounding metal!  I also love that it comes with an interchangeable nylon insert that you can use if you have delicate patterns to protect.  You can pick these up at several different metal supply places online and last time I checked, they were only about $10 more than the standard bench blocks.  Believe me….you’re hearing is worth that extra ten bucks.  😉

Number five (and the last for this post…thanks for sticking around so long) is a jeweler’s saw.

KnewConcepts 5 inch jewelers saw

The saw I’m showing is the Knew Concepts saw.  Pricey?  Yes.  Worth it?  To me, definitely yes!  You see, I never really liked sawing.  Well, truth be told, I never liked changing saw blades.  I started out with one of the economy saw frames and the standard clamp-style bench pin.  But when I was learning to saw, I was breaking blades right and left, and the economy frames can be a little tricky to load.  This new style of saw has a tension lever.  Just flip it, turn one screw and your old blade pops right out.  Insert the new one, screw and flip that tension lever back in place and its perfect every time.  Now I can honestly say I’ve turned into someone who doesn’t look at sawing as a chore anymore.

Necessities part 2, to be continued….. 😀

Spotlight….Julie Mitchell, Paradox Art Glass

One of the features that I want to make a regular around here is a spotlight on other artists.  There are so many people in the creative world that I admire; For their creativity, their work ethic and their willingness to give back to their community.  The first person I want to feature in this series is Julie Mitchell, of Paradox Art Glass.  She has one of the most generous spirits you can imagine, her glasswork is original and fun, and we haven’t even talked about her silk ribbons yet.  Oh my……

Silk ribbons from Paradox Art Glass


Okay, I admit it.  I have a little bit of a “problem”.  That hat box is 14 inches across, and 8 inches deep, and its filled to the top with ribbons of crinkle silk, dupioni, solid colors, water colors…and did you notice the tiny little packages??  She’s now making her beautiful cords in bracelet length!!  Perfect for us metal workers, and a fabulous way to give a really feminine flair to what can sometimes be an industrial looking piece.  I can see I’m going to have to find a whole new box for her newest product line, but with colors like these to tempt, can you blame me?

If you’re interested in seeing Julie’s art glass or purchasing some of her ribbons to have for your own use (’cause I sure ain’t sharing mine!  😀 ), visit her Etsy shop.

Good things come in small packages….

Even studios!  My friends are constantly kidding me about needing to “come out of the closet”.  No, not THAT closet….my metal closet!  I converted a 9-1/2 foot by 5-1/2 foot walk-in closet in my bedroom into a mini-metalworking studio!  Its amazing how much stuff you can put into a small space.

I purchased a workbench at Harbor Freight Tools and managed to squeeze it along one wall.  This is where I do my cutting, sawing, pounding, polishing and designing.  See the foredom hanging from underneath the closet shelf at the end?  What a little workhorse!

Metal working bench

When you’ve got such a small space to work with, going vertical is an absolute must!  I extended my storage options by adding a bench topper.  It has two railed shelves, and even though its only 6 inches deep, it holds a ton of stuff!  Mine is crammed full of metal stamps, alphabet stamps, my forming stakes, and a pretty box of metal sheet that is already textured and ready to be transformed.  Above the bench, I hung a half-sheet of pegboard and created the “hammer shrine” for my pretty Fretz hammers and all the other forging tools I need.

Vertical Storage

On the opposite wall behind my chair, I’ve got shelves and cubbies crammed full of metal, jewelry findings, seed beads, yarn, books….anything and everything I could need for finishing those special projects.  And check out the cool library card catalog cabinets!  Those were a birthday gift this year, and now I’ve got drawers to spare.  That must mean its time to go shopping again, right?  😉

Cubbies and drawers

I hope my little studio tour gave you some ideas on how to maximize the space you’ve got to work with.  If you have great storage ideas you’d like to swap, please leave a comment and tell me all about them!  😀